About Me

- Cookiez Kreationz
- PSP is my world, need I say more :) If you would like to reach me regarding my tutorials and other things then I will be glad to answer them, but please no spam emails thank you. E-mail me at cookiezkreationz@yahoo.com. I wanna thank Nikki from Killer Kitty Scraps for making my really cute blog layout, thank you hun!
Blinkie
Just right click and save image :)




I CT For


Proudly CT @

UYA Society Gals











Thursday, January 16, 2014
PTU: Forest Wonder Tutorial
Have you checked out Henning Ludvigsen art, "The Asend."???
He has some awesome artwork you need to check out, Sold Only at THEPSPPROJECT
Check him out! You won't be disappointed!
"Forest Wonder"
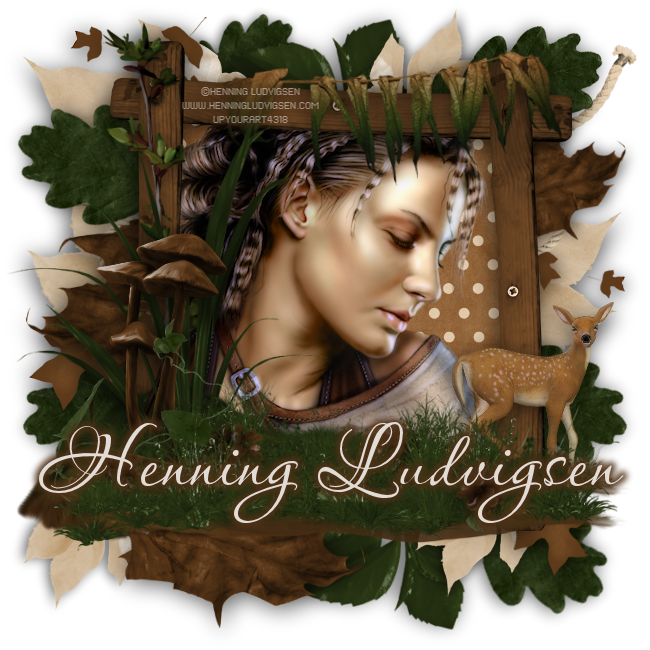
PTU Scrapkit by Karra's Kreative Korner: Outdoor Odyssey
Enjoy my tutorial :)
You must have working knowledge of Corel Paint Shop Pro X2 or newer
By the way I always start my canvas's at 650x650 , but you are free to open a canvas bigger or smaller, and scale the elements to the size you want. But if you are like me, keep reading on, thanks.
Okay Ready, set, GO!
Open a 650 x 650 new canvas,
Open frame kk_frame1, copy and paste in the center of your new canvas, now for these nezt steps simply remember you are arranging the elements under and around the frame, duplicate as much as you need, follow my signature for example.
Next open these elements, and be sure to apply Drop Shadow to each
Open-kk_leaf1 , re-size to 60%
Open- kk_leaf2, re-size to 60%
Open- kk_leaf3, re-size to 40%
Open- kk_leaves1, re-size it to 80%
Open- kk_leaves2, re-size it to 60%
Open- kk_rope2, re-size it to 80%.
Open- kkpaper8, re-size to 50%, <---make sure you paste this under your frame!
Open- kk_ground, re-size to 80%,
Open- kk_hill, re-size to 50%,
Open- kk_plant2, re-size it to 80%, <-make sure to go to.... Image-> and click on "Rotate Right"
Open- kk_tall grass, re-size it 80%,
Open -kk_mushroom, re-size 40%,
Open- kk_grass,
Open- kk_fawn1, re-size to 40%,
Open- kk_vines,
Open- kk_pinecone, re-size to 10% <-- duplicate a few cones and place them around the grass.
Now that you have re-sized these elements according to my sizes, added the drop shadows to all. Except for the grass.
Now off to your tube, first find a nice close up tube, I choosed Henning Ludvigsen artwork. His close up artwork, "The Asend," is just perfect for Karra's Outdoor Odyssey kit.
Place your close up tube under your frame. Apply a drop shadow, and your almost done ;).
Now Add your copyrights of your tube and your license.
Add your name.
And your done.

Tuesday, January 14, 2014
PTU: New Start Tutorial

Monday, January 6, 2014
PTU: Memories

PTU: City Party Girl

Wednesday, December 4, 2013
Happy National Cookie DAY :)
Saturday, November 2, 2013
PTU: Mary the Social Butterfly Tutorial

Enjoy my tutorial :)
You must have working knowledge of Corel Paint Shop Pro X2 or newer
Okay Ready, set, GO!
Open Dee's Template 15 "Butterfly", re-size to 650x650
Open ciz_obsessions_paper10, C/P last layer of the template
Head to your layers tab-->Load/Save Mask-->Load Mask from Disc
From there choose any mask you want or choose the one I used with a circular pattern.
And Click Load
Now you want to Merge group
Using your mouse, mouse over your layer where you had paste your paper at, and right click on your mouse
Next it will pop another option for you, you want to look for "Merge"--> "merge group".
Tada you have a masked layer.
Next, choose any papers you like, from papers folder, C/P them each over the shapes of the template.
This next step will help you see what I had done to cut the papers out to the shapes of the template, if you need it. If not then you can skip this part :)
Open ciz_obsessions_paper8 Copy and paste it over one of the ovals of the template, next you will want to grab your magic wand tool, click on the rectangle of the template, press Ctrl+Shift+I on your keyboard, this will allow you to invert.
This next step will help you see what I had done to cut the papers out to the shapes of the template, if you need it. If not then you can skip this part :)
Open ciz_obsessions_paper8 Copy and paste it over one of the ovals of the template, next you will want to grab your magic wand tool, click on the rectangle of the template, press Ctrl+Shift+I on your keyboard, this will allow you to invert.
Next click the ciz_obsessions_paper8, and hit your delete key once.
*Do these same steps for all the shapes of the template.
Now you should have perfectly cut shapes, layered with your favorite papers.
*Do these same steps for all the shapes of the template.
Now you should have perfectly cut shapes, layered with your favorite papers.
Next open these elements, and be sure to apply Drop Shadow to each
Open- ciz_obsessions_flower2, re-size to 37%
Open- ciz_obsessions_foldedribbon, re-size to 78%
Open- ciz_obsessions_teddy, re-size to 55%
Open- ciz_obsessions_berries, re-size it to 80% and apply a free rotate at 90 degrees
Open- ciz_obsessions_curlyribbon, re-size it to 50%, using your move tool tilt this ribbon slightly diagonal,
Open- ciz_obsessions_doodle, re-size it to 60%, and apply a free rotate at 90 degrees,
Open- ciz_obsessions_branch, and apply a free rotate at 90 degrees,
Open- ciz_obsessions_bowribbon, re-size to 50%, using your move tool tilt this ribbon slightly diagonal,
Open- ciz_obsessions_bow1, re-size to 35%,
Open- ciz_obsessions_flower1, re-size it to 26%,
Open- ciz_obsessions_butterfly, re-size it 30%,
Open -ciz_obsessions_sparkles, re-size 50%,
Open- ciz_obsessions_polishedbutterfly, re-size to 30%,
Now that you have re-sized these elements according to my sizes.
Add your choice tube and place her over the top of all the layers of the template, but behind the elements.
[[see my signature for example]]
Now Add your copyrights of your tube and your license.
Add your name.
And your done.
Thursday, October 24, 2013
PTU: Happy Halloween Tutorial
Well Halloween is nearing and Amy Marie has the cutest scrap to match any Halloween witches you have to your collection, but don't be fooled there's nothing too sexy in this kit that you can't make it incredibly cute, be psp tubes or your own personal photos of your kids/friends, Amy Marie kit "Sexy Witch," is perfect for you.

Subscribe to:
Posts (Atom)
Fav Blogs


















Blog Train

Fav Stores



Popular Posts
-
 Taking a second look at Zombies, apparently there's a zombie frenzy out there, but who says you can't look smokin' hot while y...
 -
 Wanted to share a few masks I made, hope you ladies like em :) Click HERE to download Happy tagging!
 -
 Love Karra's latest kit creation, certainly not ready for fall yet are we? Check out "Coronach" packed with gorgeous reds a...
 -
 Scrapkit by KillerKitty You can find her awesome PTU: Punkilicious Neon Kit at her store HERE Font Billy Argel Filters used: Xe...
 -
 I wanted to show off an Artist that specifically captured the scariness of undead feens and Corlen Scope only found at Thepspproject has...
 -
 It's October time, guess what I love Halloween, let's kick off October with a Halloween tag. Oh and this week 1st of every month, ...
 -
 "Alena Mystical Forest" PTU Art by Alena Lazareva Enjoy my tutorial :) You must have working knowledge of Corel...
 -
 Feeling the need for a cute Steampunk kit? Check out Irish Princess Designs latest creation, packed with 60 rad, vintage elements, and 10 ...

