About Me

- Cookiez Kreationz
- PSP is my world, need I say more :) If you would like to reach me regarding my tutorials and other things then I will be glad to answer them, but please no spam emails thank you. E-mail me at cookiezkreationz@yahoo.com. I wanna thank Nikki from Killer Kitty Scraps for making my really cute blog layout, thank you hun!
Blinkie
Just right click and save image :)




I CT For


Proudly CT @

UYA Society Gals










Monday, October 14, 2013
PTU: Coronach Timeline Tutorial

Open new canvas the size should be 800 x 315
Open kkpaper11, use you move tool and tilt the paper a little to the left, and paste it on the far left
Open kkpaper 9, use your move tools and tile the paper a little to the right and paste it in the center

Saturday, October 12, 2013
Featuring Angela Newman's "Mei Li"
Today extras made from
Angela Newman latest art, "Mei Li" only found at The PSP Project , HERE!
Paired with a kit "Coronach" by Karra's Kreative Korner!

Snags are below, all you have to do is copy and save but please do not claim them as your own.
Thank you Again :)


Thursday, October 3, 2013
PTU: Spring Breeze Tutorial
Gemini Creationz has brought us a fabby cute kit, filled with soft colors, perfect kit for anyone who loves spring and pretty flowers, oh and birds. Available for purchase at THEPSPPROJECT store today.

Wednesday, September 18, 2013
PTU: Ready for Winter Tutorial

Saturday, August 24, 2013
PTU: Spot A Mermaid Tutorial
My latest tutorial, using Soxational Scraps Ocean Waves, I
absolutely love her elements, and I hope you will love it too.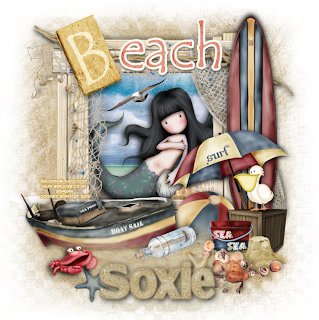
You must have working knowledge of Corel Paint Shop Pro X2 or newer
Okay Ready, set, GO!
Open a 650 x 650 new canvas,
Open TW-OW-Paper11, C/P into canvas
Head to your layers tab-->Load/Save Mask-->Load Mask from Disc
From there choose any mask you want or choose the one i used with a rectangular pattern.
And Click Load
Now you want to Merge group
Using your mouse, mouse over your layer where you had paste your paper at, and right click on your mouse
Next it will pop another option for you, you want to look for "Merge"--> "merge group".
Tada you have a masked layer.
Next open these elements, and be sure to apply Drop Shadow to each
Open- TW-Ocean Waves Frame1, re-size to 80%
Open- TW-Ocean Waves Netting, re-size to 70%
Open- TW-Ocean Waves Twine, re-size to 80%
Open- TW-Ocean Waves Surfboard, re-size it to 70%
Open- TW-Ocean Waves Beach Ball, re-size it to 40%
Open- TW-Ocean Waves Umbrella, re-size it to 40%.
Open- TW-Ocean Waves Starfish 1, re-size to 20%,
Open- TW-Ocean Waves Create, re-size to 20%,
Open- TW-Ocean Waves Bucket2, re-size to 25%,
Open- TW-Ocean Waves Sand Castle, re-size it to 27%,
Open- TW-Ocean Waves Beach, re-size it 70%,
Open -TW-Ocean Waves Pelican, re-size 28%,
Open- TW-Ocean Waves Boat, re-size to 65%,
Open- TW-Ocean Waves Starfish 3, re-size to 20%,
Open- TW-Ocean Waves Crab, apply a mirror effect, re-size it to 20%,
Open- TW-Ocean Waves Shells1, re-size it to 30%,
Open- TW-Ocean Waves Bottle, re-size it to 23%,
Open- TW-Ocean Waves Bird2, re-size it to 40%,
Now that you have re-sized these elements according to my sizes.
First you take your frame place it into the center of your canvas.
To add a picture into the frame, choose TW-OW-Paper1, and re-size it to 50%, and C/P under the frame.
Now add a sandy element under your frame, grab TW-Ocean Waves Sand2, we are going to turn this element into a mask layer.
Why you ask, because its a short cut to erasing the corner edges to smooth out the sand.
Place this sandy element under your frame, and take all the elements you had re-sized, and place them all over the sand.
Add your choice tube and place her under your frame.
Now Add your copyrights of your tube and your license.
Add your name.
And your done.
Saturday, August 17, 2013
PTU: My Secret Garden

Enjoy my
tutorial :)
You must have working knowledge of Corel Paint Shop Pro X2 or newer
You must have working knowledge of Corel Paint Shop Pro X2 or newer
Okay
Ready, set, GO!
Open a 650
x 650 new canvas,
Open IPD_G_Paper7,
and copy and paste it into your canvas,
Head to your layers tab-->Load/Save Mask-->Load Mask from Disc
From there choose any mask you want or choose the one I used with a circular pattern.
And Click Load
Now you want to Merge group
Using your mouse, mouse over your layer where you had paste your paper at, and right click on your mouse
Next it will pop another option for you, you want to look for "Merge"--> "merge group".
Tada you have a masked layer.
Head to your layers tab-->Load/Save Mask-->Load Mask from Disc
From there choose any mask you want or choose the one I used with a circular pattern.
And Click Load
Now you want to Merge group
Using your mouse, mouse over your layer where you had paste your paper at, and right click on your mouse
Next it will pop another option for you, you want to look for "Merge"--> "merge group".
Tada you have a masked layer.
Next
open these elements, and be sure to apply Drop Shadow to each
Open- IPD_G_Tree1, re-size to 90%
Open- IPD_G_Tree1, re-size to 90%
Open-
IPD_G_Swing, re-size to 30%
Open-
IPD_G_Sparkles (don’t apply D/S)
Open-
IPD_G_Grass, (duplicate several grasses at most 8)
Open-
IPD_G_Leaves, re-size it to 30%
Open-
IPD_G_Rocks, re-size it to 25%
Open-
IPD_G_Arch, re-size it to 45%.
Open-
IPD_G_Flowers, re-size to 35%,
Open-
IPD_G_Bottle, re-size to 20%,
Open-
IPD_G_TallFlowers, re-size to 15%,
Open-
IPD_G_Lantern, re-size it to 25%,
Open-
IPD_G_Basket, re-size it 15%,
Open
IPD_G_Plant, re-size 20%,
Open-
IPD_G_WateringCan, re-size 18%,
Open-
IPD_G_Bird, re-size to 12%,
Open-
IPD_G_Bench, re-size to 30%,
Open-
IPD_G_Pillows, re-size it to 12%,
Open-
IPD_G_Parasol, re-size it to 18%,
Open-
IPD_G_Book, re-size 20%,
Open-
IPD_G_Vine, re-size to 30%,
Now lay
your grass elements down, and your tree behind your top grass layer, and place
swing under your tree.
Grab your
arch, decorate it with the flowers, and the furniture elements.
Grab your
bench, decorate around it with the flowers, the book, umbrella, and pillows.
For mine I
took the vine placed it into the book to give it a whimsical look.
See my
signature for example.
Now Add copyrights to the scrap kit you’re using, I am using Irish Princess Designs, Gardenia kit, if you choose to use the same elements in my tutorial, please purchase her Gardenia kit.
Now Add copyrights to the scrap kit you’re using, I am using Irish Princess Designs, Gardenia kit, if you choose to use the same elements in my tutorial, please purchase her Gardenia kit.
Then add your name.
And you’re done.


Subscribe to:
Posts (Atom)
Fav Blogs















Blog Train

Fav Stores



Popular Posts
-
 Taking a second look at Zombies, apparently there's a zombie frenzy out there, but who says you can't look smokin' hot while y...
 -
 Wanted to share a few masks I made, hope you ladies like em :) Click HERE to download Happy tagging!
 -
 Love Karra's latest kit creation, certainly not ready for fall yet are we? Check out "Coronach" packed with gorgeous reds a...
 -
 Scrapkit by KillerKitty You can find her awesome PTU: Punkilicious Neon Kit at her store HERE Font Billy Argel Filters used: Xe...
 -
 I wanted to show off an Artist that specifically captured the scariness of undead feens and Corlen Scope only found at Thepspproject has...
 -
 It's October time, guess what I love Halloween, let's kick off October with a Halloween tag. Oh and this week 1st of every month, ...
 -
 "Alena Mystical Forest" PTU Art by Alena Lazareva Enjoy my tutorial :) You must have working knowledge of Corel...
 -
 Feeling the need for a cute Steampunk kit? Check out Irish Princess Designs latest creation, packed with 60 rad, vintage elements, and 10 ...

